Data Binding
Let’s assume you want to introduce some basic logging in your journeys and would want to write who entered a particular path.
There’s no communication on that path and you don’t want to rely on code running while the message is prepared (some people may be opted-out after all), so you turn your gaze to the Update Contact activity and start wondering how to use it for this case.
The way the Update Contact activity in Journey Builder presents itself is pretty humble – it seems like it can’t assign any dynamic values and can only write hard-coded values to the DE you select.
Why would anyone want to write only the same values for everyone is beyond me. Nevertheless it’s possible to make this activity write personalized values from both the Contact and Journey, but it’s tricky and the key mechanism is hidden from us.
To dynamically log different values for the people entering the journey we need to utilize what is described as data binding which will allow you go grab data from:
- Journey (entry) data, but be aware this data does not change as is frozen in time and represents the state in which the data was when the customer entered the journey
- Contact data – real-time user data from attribute groups from the contact model in Contact Builder.
- Context Data – technical information about the journey
Contact Data
To grab this type of data you need to follow this pattern: {{Contact.Attribute."ATTRIBUTE SET NAME"."ATTRIBUTE FIELD"}}
For example if you want to get the Subscriber / Contact Key, you would need to use: {{Contact.Attribute."Contact"."Contact Key"}},
but only in this instance you could simply use {{Contact.Key}}
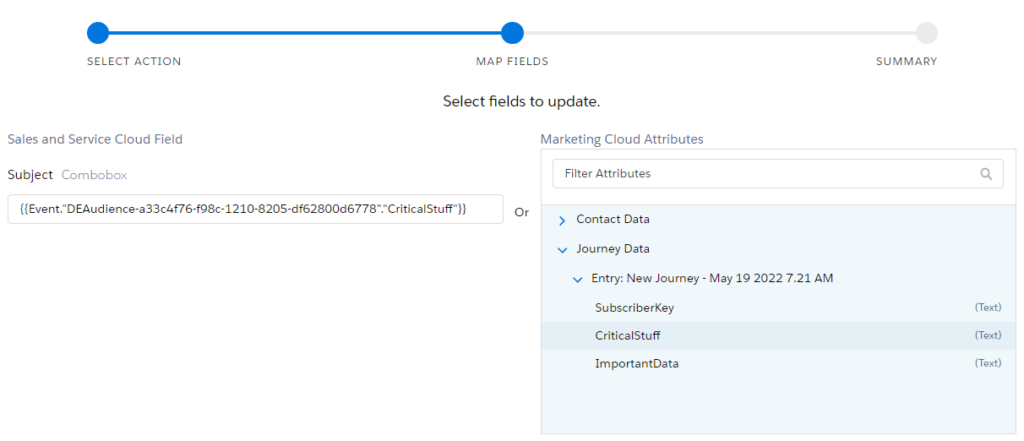
Consider this custom attribute group:

You can get the ImportantData attribute by typing out: {{Contact.Attribute."LevelOne"."ImportantData"}}.
The CriticalStuff field can be accessed with {{Contact.Attribute."LevelTwo"."CriticalStuff"}}.
That’s cool and all, but it’s easy to make mistakes when writing strings like these. Luckily, there’s a trick we can use.
The easy way of grabbing the data
There’s a much easier way of getting this data, when you play around with the interface:
- Get a text editor open – we’ll be copying and pasting data binding strings (similar to the code shown above)
- Create a Task or any other SF object block in your journey and start configuring it
- Click Create New in the Select Action step
- Choose any field from the list that corresponds to the data type you want to grab
- Subject is my favorite for text values
- Select if you want to use Contact or Journey Data
- Select the value you want to insert with your Update Contact activity
- The data binding string you want will appear on the left side of the screen below the name of your Sales and Service Cloud Field of choice
- Copy the string into your text editor
- Repeat the last 3 steps for as many values as you want include in the Update Contact activity, but remember there’s a limit of 5 fields that activity can use
- Close the Task activity and paste the value(s) you selected into your Update Contact activity
Example
Let’s consider the setup I presented earlier:
If we were to choose our LevelTwo data extension as a Data Extension entry source we could get the CriticalStuff field value in two ways:
- Contact Data:
{{Contact.Attribute."LevelTwo"."CriticalStuff"}} - Journey Data:
{{Event."DEAudience-a33c4f76-f98c-1210-8205-df62800d6778"."CriticalStuff"}}
Binding multiple values into one field
I just want to point out the possibility of binding multiple values into one field. You can write something like this:
{{Contact.Key}};{{Event."DEAudience-a33c4f76-f98c-1210-8205-df62800d6778"."CriticalStuff"}}
There might not be a lot of use cases for this, but it’s a way of putting more data into a DE than the 5 values allowed by the Update Contact Activity
* excluding field type and data length
Context Data & Other Data Binding Expressions
This is an overview what can be retrieved with Data Binding Expressions:
| Data Binding Syntax | Description |
{{Contact.Key}} | The Subscriber / Contact key |
{{InteractionDefaults.MobileNumber}} | Default mobile number for this Journey Builder. This is set from Journey settings menu; this can be a phone number attribute from entry source or mobile number attribute from contacts |
{{InteractionDefaults.Email}} | Default email address for this Journey Builder. This is set from Journey settings menu; this can be an email attribute from entry source or email attribute from contacts |
{{Contact.Attribute.“AttributeSet Name”.“Attribute Name”}} | Value for contact attribute; this is found from data designer when we link data extension to contacts. We already discussed this above |
{{Contact.Default.Twitter}} | Default Twitter handle for contact |
{{Contact.Default.Facebook}} | Default Facebook address for contact |
{{Contact.Default.SMS}} | Default SMS address for contact |
{{Interaction.{ActivityCustomerKey}.{OutArgumentName}}} | Out argument from other journey builder activity |
{{Context.PublicationId}} | Version of the journey |
{{Context.DefinitionId}} | Definition of the journey |
{{Context.DefinitionInstanceId}} | Each time a contact runs through the engine, the engine creates a unique ID |
{{Context.VersionNumber}} | Version of the journey |
{{Event.{my-custom-entry-event-key}.{field-name}}} | Event field value |
{{Event}} | See what’s inside the journey snapshot |
Building the Journey Log
Before we start building you need to know a few facts about the Update Contact activity:
- it does not respect composite keys (multiple primary keys set up to build unique combinations of various columns)
- it does not care for your primary key – even if there’s one
- it only considers the value defined in the Send Relationship as the key field which it uses to add or update records
With that out of the way we can think how a Journey Log should work.
The requirements:
- it should be able to log the Subscriber Key
- it should allow a contact to be logged multiple times as separate records in each of their runs through your journey
- it can log data from multiple points in the same journey
- you could use this to:
- debug the data before and after a decision split or any other activity
- measure the speed of a journey (could be important with Custom Journey Builder Activities)
- you could use this to:
The Data Extension Setup
The field configuration is quite simple with only primary key:

The Send Relationship needs to be set up this way:

Although we will not be pushing the Subscriber Key into the RecordId field, we have no other choice – the Update Contact activity only works with one key defined in this relationship.
We will be pushing our own value in the Record ID field that we will be building in the Journey.
Journey Setup
Imagine we have a more complex journey with several paths and points at which we want to log data:

To enable the journey to log multiple records over one journey run, we need to force the Update Contact activities to generate a unique Record ID in each step.
We build it this way:
- starting with
{{Context.DefinitionInstanceID}}- it will return the unique ID of each individual journey run of a contact through the journey
- it has length of 36 characters
- this string makes it possible for us to log a contact entering the same version of the journey multiple times
- adding an
@sign just as a separator - extending that with the name of each control point (we need to do this manually)
This will generate unique IDs in the vein of: c372a1ca-1e49-46f9-9cf6-41a9927db8f7@2B
In the end our journey will look like this:

Build Your Own Key
If you wanted to log multiple journeys or journey versions, you could expand this and add other Context data to build the ID, like:
{{Context.DefinitionId}}– this is a unique journey identifier{{Context.VersionNumber}}– this one is self-explanatory
Then you could end up with a more complex key, for example:
{{Contact.Key}}^{{Context.DefinitionInstanceID}}>{{Context.DefinitionId}}#{{Context.VersionNumber}}@ControlPoint1
Which could be logged as:
0032p00002VQAZcAAP^a381692d-a7ca-42e4-bdeb-771348ba01d6>db4be536-af1d-4591-b74a-a37b4d5fb632#50@ControlPoint1
This is already pretty long (109 characters), but the final length will depend on your Subscriber / Contact Key (though it should have the length of 18 characters according to best practices) and the manually added parts (marked in yellow).
The Results
As we would expect each of the control points creates a new record:

This might not be a lot of data, but you can extend it to capture much more than the subscriber keys and the few values I mentioned in this article.
If you want to learn more about the Update Contact activity…

Please Note:
This article was created as part of the #SFMCTipsAndTricksChallenge on LinkedIn started by Michał Rzepka – the members of the SFMC community were asked to share 3 tips about the system.
Lots of people responded already sharing great tips for beginner and advanced developers alike, so make sure to check the tag out.
You can find my two other tips (about using the CloudPagesURL in the SMS context and using console.table for debugging):